
Hi everyone! Marcy here… and I’m super pumped to be sharing my first Paislee Press project with you all today!
I hemmed and hawed over it for a while. What was I going to share with you all this month? In the end I decided that, as an introduction, it maybe would be a good idea to share just how I go about creating a typical pocket page spread.
So, here we go…
Every spread starts with photos. This year I’m working in a 6×8 size. Currently this is the perfect size for me. My kids are older and there’s just not as many photos taken now as there used to be. I also love the small size of it… it kinda feels like a mini book!
And I’m all about simple and minimal… so a smaller size seemed to be a good idea for me.
The spread I’m working on today includes three photos. I printed them at home and trimmed them to size. I like to keep a white border on them so I just print them slightly smaller so that I can still get that effect.

The newest release, Bright Ideas, just came out and I felt that the colors would work really well for these photos.
Generally I let me photos tell me what colors I should use and I go from there.
I’m very comfortable using Illustrator. I spend hours designing in it on a daily basis, so it’s my software of choice when I’m doing more than just printing a PDF.
I wanted to print out more than I needed so that I could just store the rest with my other pocket page supplies. And, at this point I don’t have a SUPER clear plan in mind yet.
I chose some of my favourite cards and dragged them onto a 8.5×11 canvas. On a second 8.5×11 canvas I used a 3×4 clipping mask to take samples of some of the patterned papers I really liked.
On the final canvas I copied the 3×4 paper samples and then added a small white box on the lower half for journaling space.

From here I trimmed my cards with my trimmer. I like that I’ll have a lot of options going forward.

This year I’m really embracing simple. That means some pattern, fewer words (I still journal in a notebook) and a focus on photos.
At this point I play around with the arrangement of my photos and switch various cards in and out. Eventually I ended up with this layout. My biggest concern is usually the “weight” of my pages. As an example, here I balanced the photo of the logs with the red striped card on the opposite side of the page. Had I placed those two closer together the balance of the page would have shifted and it would have felt heavier on one side than another.

Once I’m happy with placement I’ll start adding my journaling and other small embellishments. This time all it needed was a little journaling.
Tip // When I’m using a busy card and I want to add journaling I’ll typically write/type on a tag or label and add that to the card.

Occasionally I like to include a little bit of a totally random color. I honestly have no idea why. Maybe it’s my way of making just a little more imperfect.
In any event, for this spread I decided to add a touch of neon yellow with some wash tape (because really, what is more random than neon yellow).

With my cards completed I’ll look everything over and see if I want to shuffle anything else around before calling it done.

Generally I find that by keeping my spreads simple and classic I’m able to keep this project do-able and stress free.

And really, that is something that can’t be at all bad!

xo Marcy
Products // papers – Bright Ideas, journaling cards – Bright Ideas
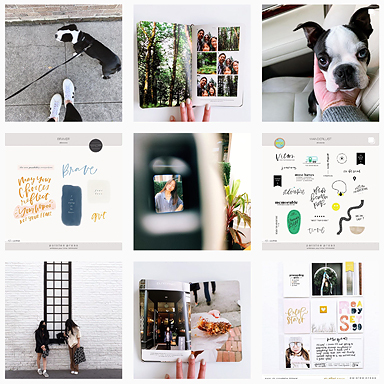
You can find out more about me and my everyday on Instagram or my blog.


Love this spread, Marcy! Thanks for sharing your process.
Absolutely loved reading about your process – veeeeeery similar to my own (great minds…?). I adore your style and can’t wait to see more of you in this space! xoxo, C
[…] Loved reading about this process. […]