
Hi there! It’s Catherine here. For the last few years I’ve documented our December in some way using pocket pages; but this year, we are moving and traveling for the entire month, which takes the craziness of the holiday season to another level. Rather than photograph as much as I can this month and then carry the project over into the new year (been there, done that), I’m keeping it simple for twenty-fifteen and documenting digitally throughout December. Here are the steps I took to prepare for this project with the hope that it’ll be simple enough to actually get done.
1 | choose a format

By format I mean size and printing method. Size could be 4×6, 5×7, 6×8 or something else entirely. Printing method could be photos slipped into pockets or a photobook. If you’re going digital and want to have a tangible product in the end, it’s helpful to pick a format before you start. That way, you’ll know what orientation you’re working with as you take your photos and which size to save your photos or pages.
I’m going with a 6×8 inch softcover photobook in portrait (vertical) orientation printed through Artifact Uprising. If you’re doing a photobook, be sure to check the printer for page specifications and make sure you save your photos at high resolution (at least 300 ppi – your camera will do this for you).
2 | choose simple materials

Oh, the digital world – so many possibilities! Sticking with just one kit (or color scheme, or whatever materials you decide to work with) will help your project look really cohesive and it’ll save time on design decisions throughout the process. Even if you’re documenting with paper, I think it’s helpful for a really specific project like this to make some of those tough design decisions ahead of time. And if you suffer from “but all the things are pretty” syndrome (like me!), remind yourself that you can mix it up next year. You’ll thank yourself for keeping it simple when your December is documented the first week of January!

I’m keeping it simple this year and using only the december you are a fave no. 4 digital kit. As soon as I got a glimpse of this kit, I fell in love: the black and white, the mint green, the bright red, and the mix of patterns are all really festive and fun. The kit comes with so many 6×8 papers, templates and digital goodness that I know I’ll have more than enough for my little photobook.
3 | brainstorm photo ideas

I’m a big believer in the concept of beginning with the end in mind, even when it comes to a creative project. This time of year can get so crazy busy that I often miss capturing some of the more mundane moments – baking cookies, doing the advent calendar, stringing up outdoor lights. If you know you want to capture a particular moment or tradition, write it down. Even if you don’t look at the list again, you’re more likely to remember to break out your camera in those moments if you’ve given them a bit of thought ahead of time. It’s not the end of the world if you miss a picture, but if you take a few minutes to brainstorm some ideas before you begin your project, you’re more likely to capture the essence of what this season means to you.
4 | get organized
Getting organized for a paper project means gather lovely papers in a bin and setting it near my desk. Getting organized digitally is not nearly as glamorous, so I hope you’ll bear with me! Everyone has their own method of organizing files, but I thought I’d share a peek behind the scenes at how I stay organized digitally.
I downloaded the december you are a fave no. 4 digital kit and moved it to a new folder on my computer called “_DYD2015.” I added an underscore to the front of the files I want show up first in the lineup, alphabetically. When I finish the photobook, I’ll remove the underscores and probably move the files, but while I’m working on a project, I like to have the files easily accessible.

5 | decide on a process for dealing with photos
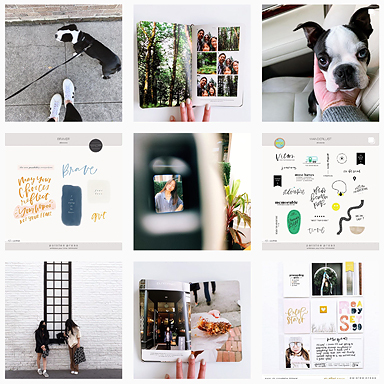
I think it’s helpful to have some kind of system or process for managing your photos. We take so many and everyone has a different workflow, but I’ll share mine as an example. First, I download my photos from the day or week to my computer and they’re automatically opened and saved in the Photos app on my Mac. From there, I select the ones I want to use and export them to the “original JPEGs” folder you see below. If I make any edits in Photoshop, I save the edited file in the “edited JPEGs” folder. That way I always have the original handy if I need to go back and change something. I find it really helpful to give each file a number, so everything will be listed in the order I want it to appear.

Finally, the “6×8 pages” folder will hold all of my 6×8 pages, listed in order and ready to upload to my photobook printer when they’re complete. Note: the examples here are from my 2014 album.

In the end, I’m still a paper girl, so I carry a notebook everywhere I go to jot notes and sketch page layouts. The convenience and freedom of documenting digitally is great, but the best way to document is the way that works for you. In the end, no one will do this for you, so find what works, keep it simple, and enjoy the process. I hope these prep tips will help you as you get ready to document your very busy holiday season!
xo, Catherine
If you’re interested in pocket pages rather than a photobook, check out this simple pocket page December album. You can also see more of my projects here, see what’s inspiring me on Pinterest or say hi on Instagram.
—
Products used: december your are a fave no. 4 collection (includes 50 patterned papers, 20 layered templates and 17 png file stamps).


Oh, I love this! I always do my project digitally, and it’s lovely to have some tips and inspiration on how to tackle it, especially from someone who makes such lovely pages! I hope you’ll share some of your pages as the month progresses (on your blog or instagram?). I just went and bought the December you’re a fave 4 after seeing this!
Hi Fiona! Thanks so much! We’re in the middle of an international move, so I won’t be working on my December album until we’re settled in our new home. I promise to post once we are, though 🙂 xo and happy new year!
Hi. I love to follow your work, but when I go to the bookmark I made for your blog it does take me to your blog, but the latest entries there are not current. I can’t tell the date of the first one, but the next entry is from Father’s Day.
I usually have to go through Paislee Press to get to your current work. Today I went through “related posts” after the Paislee Press post.
In your post there it says if you want to see more of my work go here–which leads to PP. Or you say if you want to follow my blog go here–which takes me to your blog, but only those older posts are there.
Probably I’m doing something wrong, but I do love to look at your PL spreads and it’s kind of difficult to find them without going through PP????
Thanks!
Hi Jeanne! I totally get it 🙂 The reason you’re not seeing recent blog posts is that I haven’t been blogging. I’m in the process of updating my own website (Green Fingerprint). Also, we’re an active-duty military family with two small kids also in the middle of an international move! Ha! Makes it hard to stay on top of blogging. I promise once we’re set up in our new home I’ll be able to post more regularly over at GF. For now, I post monthly at Paislee Press. Thanks for checking in! xo, Catherine